

Skill and equipment setup are critical for TIG (GTAW) welding aluminum, and this article covers both.
Most failed aluminum TIG welds are a process problem rather than a skill issue. Get your equipment configured correctly, understand how aluminum behaves, apply the right technique, and you’ll produce aesthetically pleasing welds with excellent fusion.
What Makes TIG Welding Aluminum Challenging
Aluminum oxide layer and high heat conductivity are the two primary aluminum welding challenges. However, the implications of the two, coupled with other less apparent issues make working with aluminum so difficult.
- Aluminum forms an oxide layer on its surface almost instantly when exposed to air. That oxide melts at roughly 3,700°F (3X higher than the base aluminum beneath it at around 1,200°F). That’s why aluminum welding is a two-step process: oxide removal followed by fusion.
- With about 5X the heat conductivity of steel, aluminum requires high heat input. However, aluminum’s low melting point risks burn-through, especially on thin aluminum stock.
- Highly susceptible to porosity, especially from hydrogen and hydrocarbon contamination.
- Significant risk of cross-contamination.
- Hot cracking is primarily caused with mismatching wire-alloy selection.
- Crater cracking due to insufficient filler metal deposition and high shrinkage stress. If there’s a crater at the end of the weld, the surrounding aluminum will pull it as it cools down and cause it to crack.
TIG Welding Aluminum Equipment Setup
Consumable selection and machine configuration are where most aluminum TIG setups go wrong. Get these right before you even strike an arc.
TIG Polarity Selection For Aluminum
Aluminum TIG welding requires AC (alternating current). The electrode positive (EP) phase of the AC cycle breaks up the oxide layer; the electrode negative (EN) phase drives heat into the base metal for fusion. While specialized applications can use DCEP and DCEN, AC TIG is the gold standard for aluminum.
During the EP portion of the AC cycle, the electrode becomes the positive pole (the anode). This creates a powerful attraction that pulls electrons out of the base metal. As these electrons stream toward the electrode tip, heavy Argon ions are accelerated in the opposite direction, slamming into the aluminum surface. This interaction produces highly localized, high-energy surface activity, which disrupts and removes the tenacious aluminum oxide layer.
TIG Polarity Selection | ||
DCEN | DCEP | AC |
Provides penetration. Can be used with helium for thick gauges. Rarely ever used in practice. | Provides oxide cleaning action. Can be used for low amp sheet metal welding. Rarely ever used in practice. | Standard for TIG welding. AC rapidly switches between DCEN and DCEP, providing both penetration and oxide cleaning. |
TIG Torch And Tungsten Selection
Selecting the cooling type and the tungsten rod will affect the welding duty cycle and amperage limits. The tungsten electrode will also affect the arc stability and overall fusion quality. Pure, zirconiated, and lanthanated are the best choices overall and what beginners should choose.
TIG Torch Selection | |
Water-cooled | Air-cooled |
Recommended for aluminum, particularly at higher amperages. | Can be used for thin stock and low duty-cycle welding. |
Tungsten Selection | ||||
Pure tungsten (Green) | Zirconiated (White) | Lanthanated (Blue) | Thoriated (Red) and Ceriated (Grey) | Rare-earth mixture (Color selected by manufacturer) |
Excellent for TIG welding aluminum. Not ideal for inverter machines. | Excellent performance, helps avoid contamination. | Excellent. General-purpose AC/DC tungsten. Handles higher amperage than pure tungsten. | Not for use with aluminum | Performance and suitability depends on the manufacturer’s design. Not standardized. |
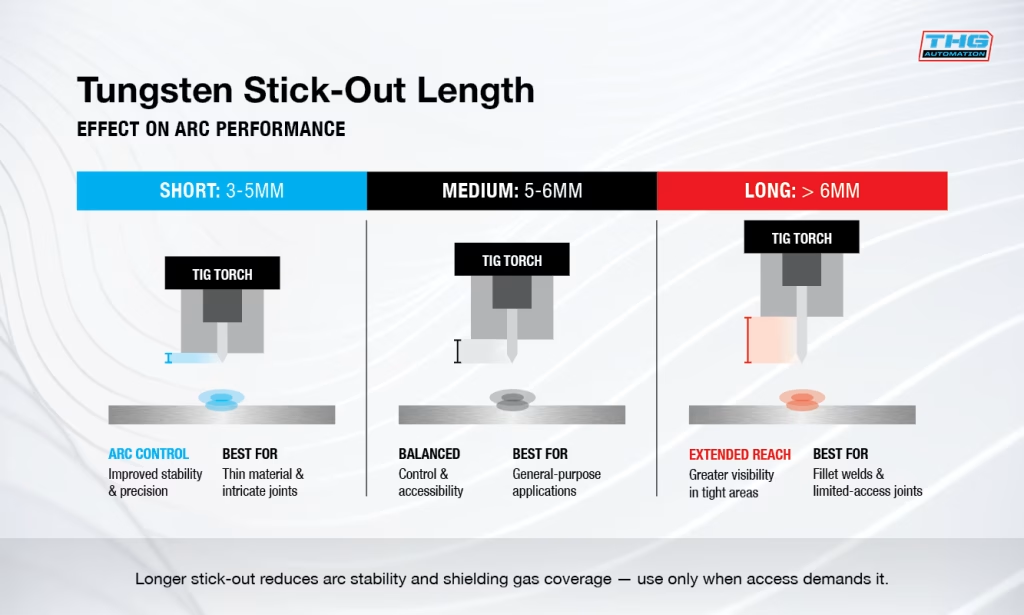
Tungsten stick-out length also matters. While this is a personal preference, the stick-out affects arc control, precision, visibility, and weldable thickness. See the guide below as a good starting point.

Shielding Gas For TIG Welding Aluminum
Unless you must use a mixture, use 100% argon for aluminum. You can’t go wrong with it. Mixtures are more challenging to procure, and this can lead to buying or renting the mixture bottles that haven’t been properly maintained. Only use highly experienced gas suppliers for mixtures.
Apply a gas flow of about 10-35 CFH, depending on your TIG cup size. If you apply excessive gas flow, you may create turbulence and contaminate the weld with atmospheric gases.
Shielding Gas Selection | |
Pure Argon | Argon-Helium Mix |
Standard for aluminum welding. | Used for specialized applications that require it. Helium improves penetration and welding speed. |
TIG Filler Wire Selection For Aluminum And Hot Cracking
TIG Filler Wire Selection | |
Always consider the wires’ chemical compatibility with the alloy to avoid selecting a hot-cracking-prone match. Base metal alloys have a standardized expectancy of hot cracking likelihood due to alloying percent. See diagram below for details. Unless your alloy needs a specialized filler wire, consider the two commonly used wires: | |
ER4043 | ER5356 |
Softer and offers better weld puddle wetting and bead appearance. Weld metal will become darker after anodizing. | Less fluid but provides higher strength and ductility. Often responds to anodizing with a good color match. |
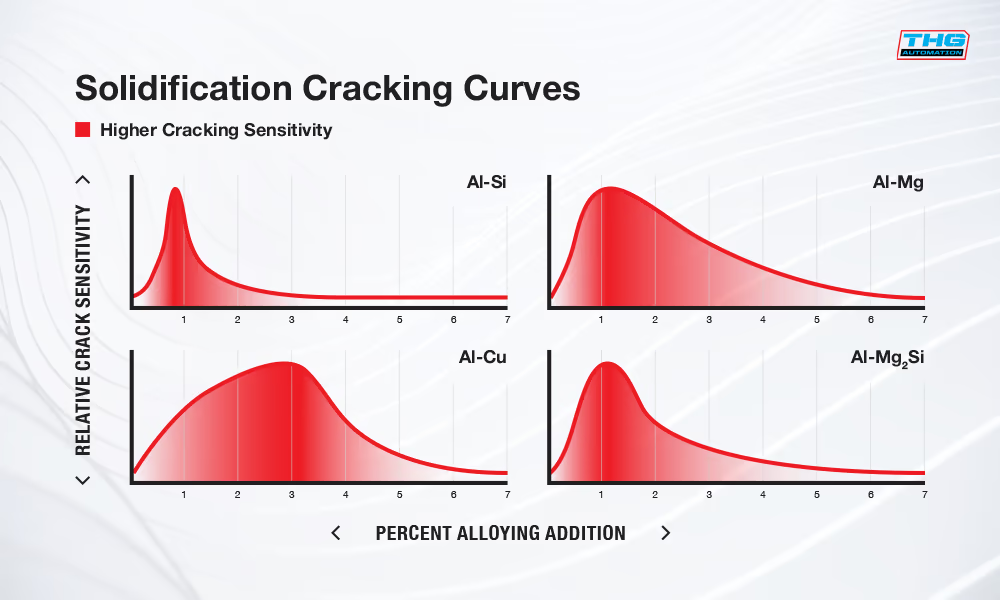
The graph shows the likelihood of hot cracking due to the alloying percent addition from the wire. To minimize the hot cracking, do the following:
- Check the alloy composition to know the current percentage of the alloying element.
- Conclude if the alloy is in the peak zone (if so, it’s prone to cracking).
- Avoid using the matching wire alloy if the base alloy is prone to cracking.
- Use the matching or similar wire if the alloy is not prone to hot cracking.
Aluminum alloys that are considered unweldable without filler wire have chemistries near the peaks on the graph. Alloys that are least likely to crack have the chemistry far off the peak.
For most welding jobs, you’ll do well with either ER4043 or ER5356. But for specialized alloys, consult the diagram for wire selection.
Aluminum TIG Welding Settings
Dialing in your AC settings is where aluminum TIG welding gets technical — and where small adjustments have an outsized impact on your results. Below is a quick overview, but we highly recommend reading our full guide on TIG welding aluminum settings.
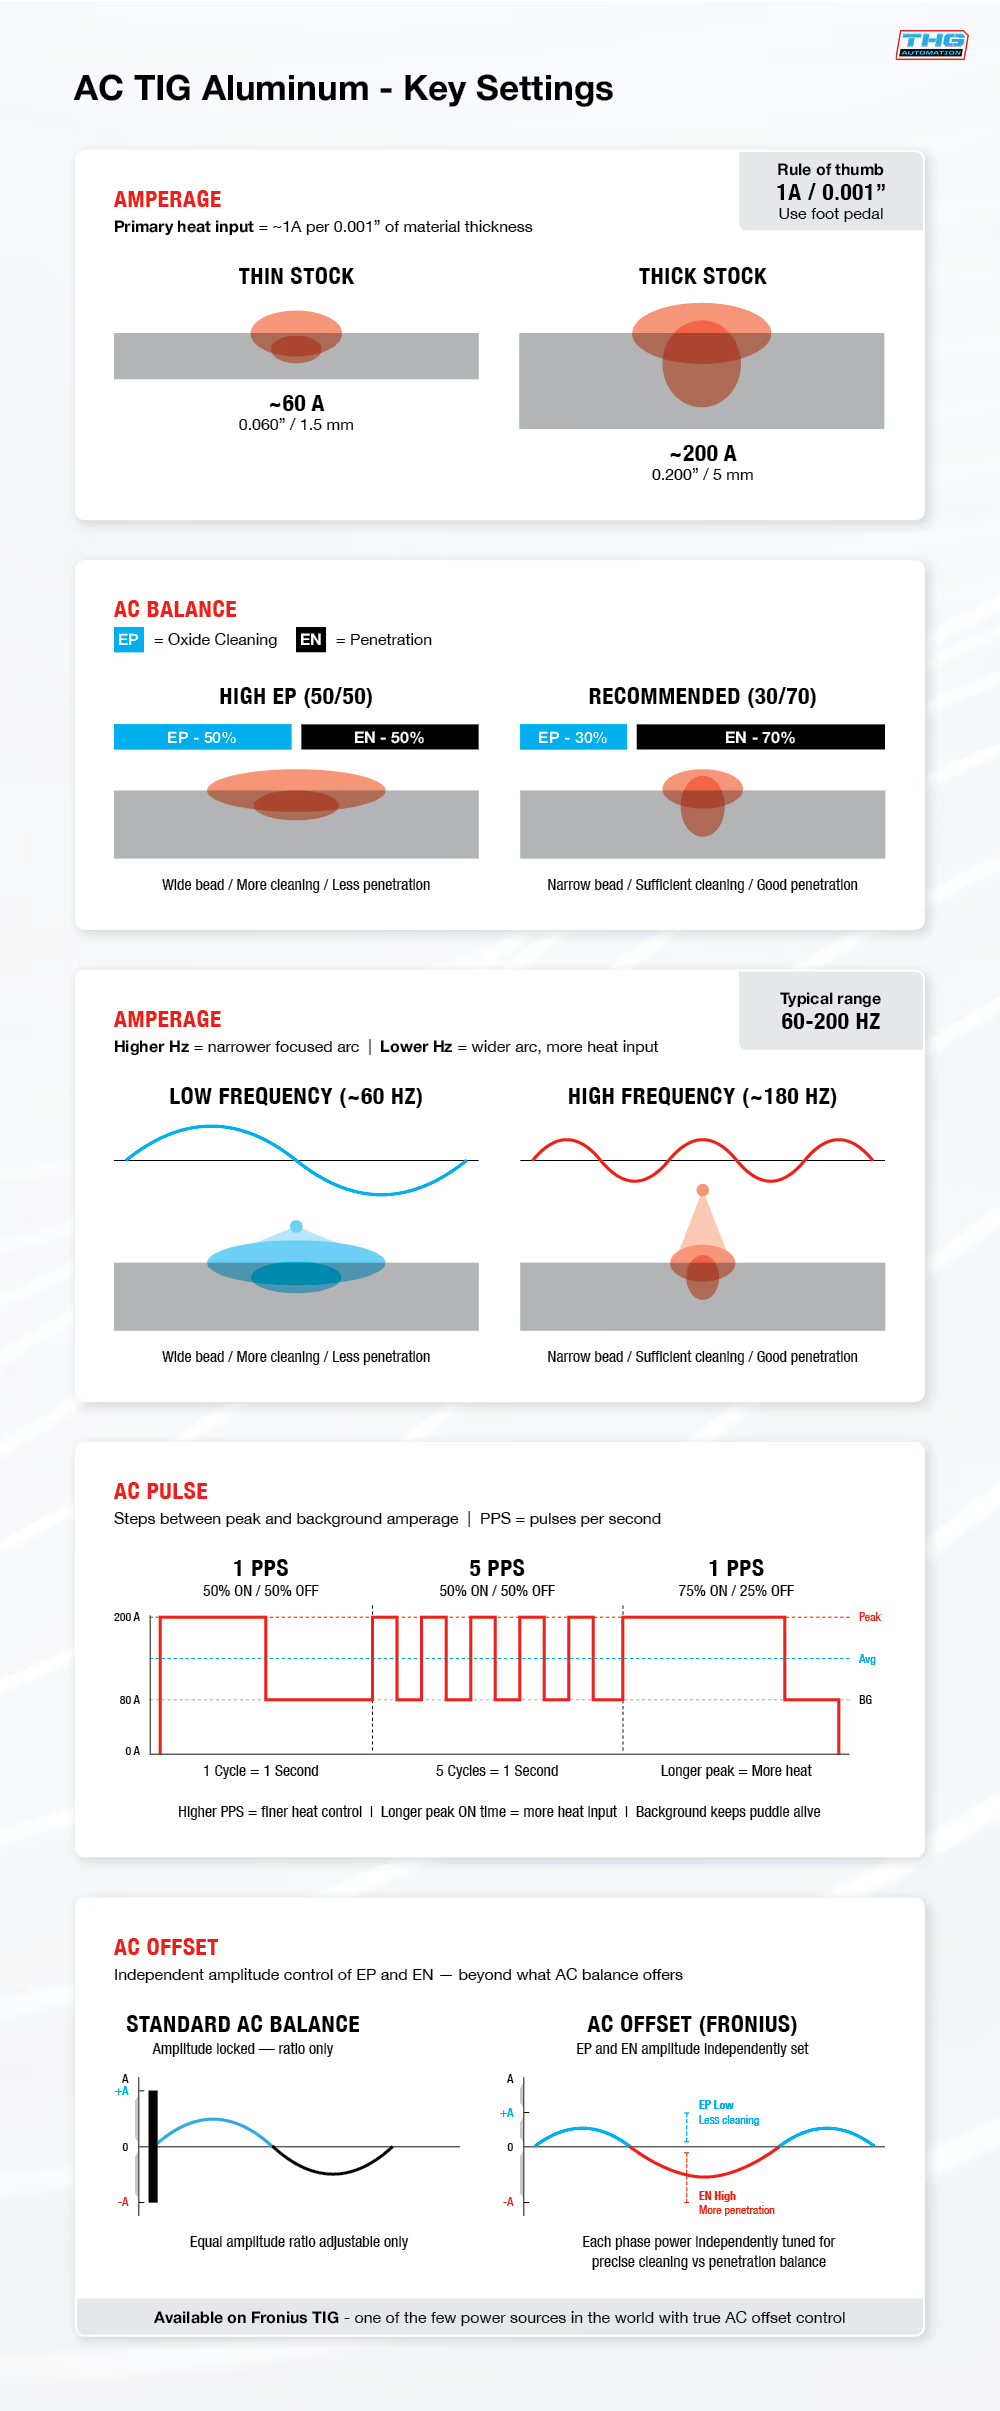
- Amperage: The primary heat input control. Starting point is roughly 1 amp per thousandth of an inch (0.001″) of material thickness.
- AC Balance: Controls the ratio of EP to EN in the AC cycle. EP increases oxide cleaning action, and EN increases penetration and reduces tungsten heating. Start at about 70% EN and 30% EP.
- AC Frequency: Higher frequency narrows and stiffens the arc for better directional control and a narrower bead profile. Lower frequency widens the arc and increases heat input.
- AC Pulse: Alternates between peak and background amperage to reduce overall heat input. It helps avoid burn-through and distortion on thin stock.
- AC Offset: Allows independent control of the EP and EN phases beyond standard balance adjustment. This gives welders precise, independent adjustment of cleaning and penetration on the power level, not just AC balance. Only a few TIG welders in the world offer true AC offset, and among the best of them is Fronius. The sheer number of features is one of the reasons why we choose Fronius for robotic welding.
How To TIG Weld Aluminum: Technique and Torch Manipulation
Good equipment setup gets you to the start line. Technique determines if you achieve the high-quality outcome. A single error in torch angle, arc length, or filler rod timing will show immediately in the weld bead.
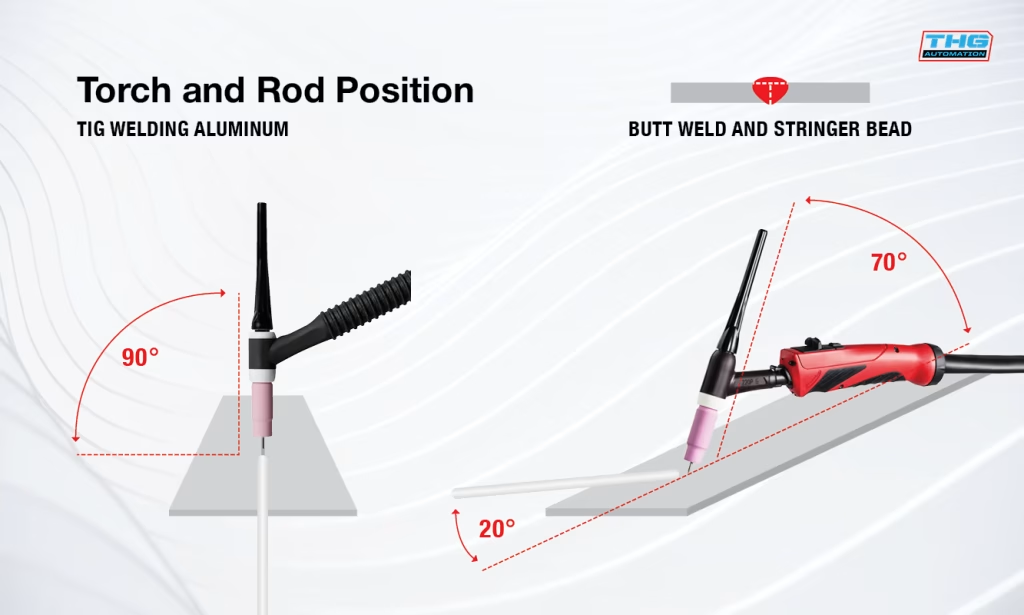
- Torch angle. Apply the torch angle of about 15-20 degrees for sound visibility and filler metal feeding as you push forward.
- Feed the filler rod at about 15° into the leading edge of the weld pool. Keep the rod tip inside the argon envelope at all times.
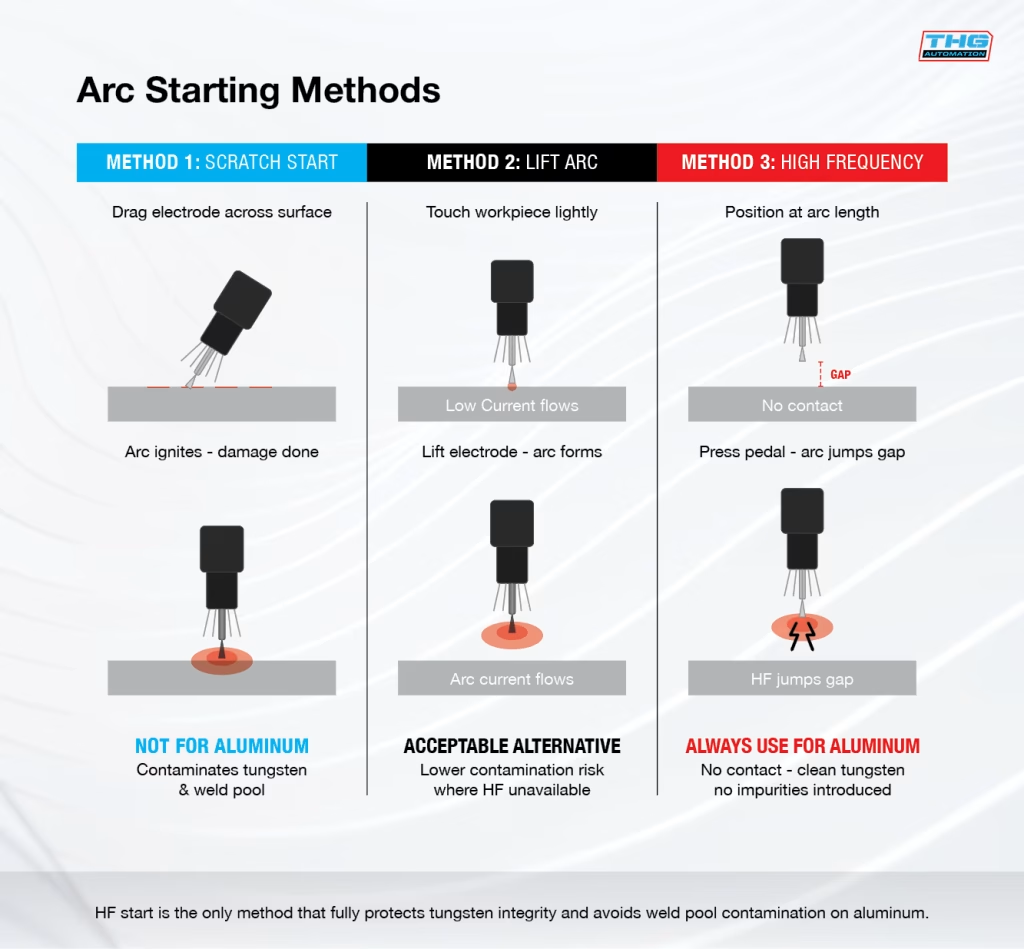
- Always use HF start on aluminum. Scratch starting contaminates the tungsten instantly and introduces impurities into the weld pool.
- Travel speed. Move at a consistent pace. On aluminum, slow travel is one of the fastest routes to burn-through. If the weld puddle grows ahead of the arc, you are moving too slowly.
- Heat control. Use your foot pedal to continuously control power. Aluminum retains heat aggressively as the weld progresses.
- Keep tight arc length at about the electrode diameter. A long arc widens the heat zone and reduces cleaning precision.
Preclean the Aluminum and Avoid Cross-Contamination
TIG welding cannot burn through or compensate for surface contamination the way MIG can. Aluminum must be absolutely clean before the arc starts.
Use a stainless steel brush dedicated exclusively to aluminum. Never use tools shared with steel. Wipe the surface with acetone first to remove oils, hydrocarbons, and moisture. Work in one direction only; scrubbing back and forth embeds contaminants deeper into the surface.
Keep filler rod clean and store it capped. Hydrogen from moisture and hydrocarbons from oils are the primary sources of porosity in aluminum TIG welds. No amount of technique fixes contamination that’s already in the material.
Robotic TIG Welding Aluminum Produces Consistent Results
Manual TIG welding aluminum takes real skill. The techniques covered in this guide require practice to execute reliably, and even experienced welders have off days. While individuals can master them, manufacturers and shops struggle with the skilled welder shortage, especially for precision welding.
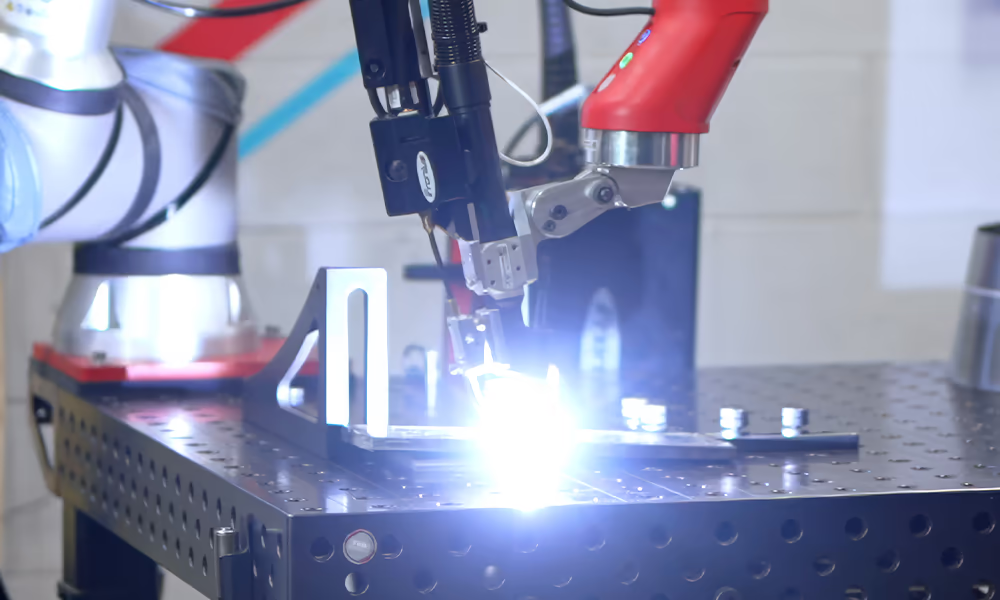
Collaborative robots, or cobots, offer a different path. Once a weld is dialed in manually, a cobot can replicate it with the same parameters, travel speed, and arc length — every single pass. For shops running repeat parts, that consistency translates directly into fewer rejects and more predictable output.
What makes cobots approachable is their robotic weld programming. Rather than writing code, operators physically guide the torch through the weld path by hand, then fine-tune positions and parameters through a simple teach pendant. If you can weld the part manually, you can teach a cobot to weld it.
THG Automation designs modular cobot welding systems built specifically for real production environments. This means easy add-on positioners, coordinated motion, rails, multi process welding, and multi robot welding systems. Start simple, expand as you need.
Interested in what robotic TIG weldingcould look like for your shop? Talk to our fabrication experts, and we’ll help you determine the best approach for your parts.